
Metal roofing installation typically involves five main phases: a pre-installation assessment and site preparation, removal of the existing roof, preparation of the decking, installation of underlayment and panels, and completion of all flashing, trim, and ridge work. For standing seam systems specifically, the process includes custom panel forming and a clip-based attachment method that requires more precision than through-fastened metal or asphalt shingles. Most residential projects take one to three days on a straightforward roof; more complex geometry adds time. What follows explains each phase in plain terms.
Before the Installation Begins
What the Contractor Assesses First
Before material is ordered or work scheduled, a qualified contractor walks the roof to assess what they are working with. That assessment covers the condition of the existing roof, the state of the decking beneath it, and the geometry of the roof structure itself.
Geometry matters more for metal than for asphalt. The number of valleys, the pitch, the presence of dormers, skylights, chimneys, or vent pipes all affect how the project is sequenced and how much precision the installation requires at each transition point. A contractor who cannot speak specifically to how they will handle each interruption in the roof plane has not fully assessed the job.
Taking Measurements and Ordering Materials
Metal roofing panels — particularly standing seam panels — are typically custom-formed to the specific dimensions of the roof. That process begins with precise measurements taken during the assessment phase. Material lead time varies depending on the manufacturer and panel profile, so homeowners should plan for a window between the initial assessment and the installation start date that accounts for fabrication and delivery. Accurate materials ordered with enough lead time are part of what separates a well-run installation from a hurried one.
What Homeowners Should Expect During Prep Day
The preparation work — tear-off, deck inspection, and any necessary repairs — happens at the start of the project before any metal panel goes down. Homeowners should plan for noise and activity from the first morning. Clearing access to the roof perimeter, moving items close to the exterior walls that could be damaged by falling debris, and keeping children and pets away from the work area are the main practical steps on the homeowner’s side.
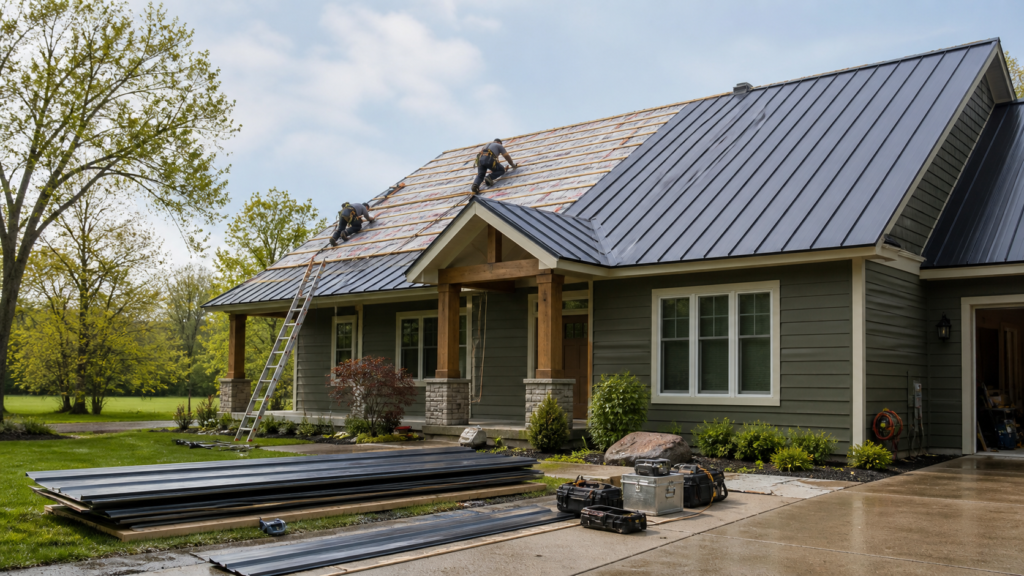
The Installation Process, Step by Step
Step 1 — Removing the Existing Roof
In most residential installations, the existing roof is removed before metal panels go down. Full tear-off gives the installer access to the decking, which must be inspected before any new material is applied. Some projects allow for overlay — metal installed over existing shingles — but this prevents a thorough deck inspection and limits the installer’s ability to identify and correct problems that will affect long-term performance.
Step 2 — Inspecting and Preparing the Decking
With the old material removed, the decking is inspected for damage, rot, soft spots, and moisture-related deterioration. Any compromised sections are replaced before underlayment goes down. A solid, continuous deck surface is a prerequisite for a metal installation that performs as intended — problems left in place under new metal become significantly more difficult and costly to address later.
Step 3 — Installing the Underlayment
Underlayment goes down before panels. It provides a water-resistive barrier between the deck and the metal above, manages condensation, and reduces noise transmission through the roof assembly. The type of underlayment used matters — particularly in climates with significant temperature variation, where the thermal performance and moisture resistance of the product affects how the full roof assembly performs over time.
Step 4 — Setting Panels and Clips
For standing seam systems, panels are not fastened directly through the surface. Concealed clips are attached to the deck at precise intervals, and the panels interlock at raised vertical seams that cover the clips completely. This is the step that most clearly distinguishes standing seam from other metal systems and the step that demands the most precision. Panels must be set square to the roof, clip spacing must account for thermal expansion across the panel width, and each panel must seat cleanly with the one before it. Panels that start out of square tend to create alignment and seam problems that become harder to correct as the run continues.
Step 5 — Flashing Every Transition, Penetration, and Valley
Flashing seals every point where the roof plane changes direction, where a penetration passes through the surface, or where two roof sections meet in a valley. Every chimney, skylight, vent pipe, wall intersection, and valley receives custom-fitted flashing designed to direct water away from the structure.
The quality of the flashing work is where long-term water tightness is determined. It is also one of the clearest indicators of installer experience — flashing transitions require precise material cutting, knowledge of how water moves across a roof surface, and careful execution at each point.
Step 6 — Ridge Cap and Final Trim Work
The ridge cap seals the peak of the roof and closes out the top edge of the panel run. Trim work — eave trim, rake trim, and any transition pieces needed to finish the edges — completes the installation. These final details are not cosmetic finishing. Properly fitted ridge and trim components prevent water, insects, and debris from entering the roof assembly at the edges, which are among the most exposed points on the finished roof.
What Makes Standing Seam Installation Different
The Concealed Fastener System
The defining feature of standing seam is the hidden fastener. Panels connect at raised vertical seams and the clips that hold the panels to the deck are completely concealed inside those seams — no screw heads appear on the roof surface. This eliminates the exposed penetrations that are the primary long-term vulnerability in through-fastened metal systems. It also allows panels to expand and contract freely with temperature changes without placing stress on the attachment points.
Panel Forming and Custom Fitting
Standing seam panels are typically formed to the exact dimensions of the roof. Field-formed panels can be run in continuous lengths from ridge to eave with no horizontal seams, which eliminates a category of water intrusion risk that exists wherever panels are lapped in the field. This approach requires equipment and skills specific to standing seam work — it is not simply general metal roofing experience applied to a different panel profile.
Why Experience Level Matters More for Standing Seam
The precision required at every stage of a standing seam installation — panel layout, clip spacing, seam forming, flashing transitions — means that the gap between an experienced and inexperienced installer is larger than it is for other roof types. A contractor who installs standing seam regularly, not occasionally, brings familiarity with the specific decisions each step requires and with how those decisions affect the finished performance of the system.
For a full explanation of how standing seam systems are designed and what the installation process involves, our service page covers both in detail.
What Affects How Long and How Complex Your Installation Will Be
Roof Geometry — Simple vs. Complex
A straightforward gable or hip roof with clean valleys and no penetrations is the most manageable metal roofing project. The more interruptions a roof has — dormers, multiple valleys, changes in pitch, intersecting roof planes — the more labor the project involves at each transition point. This is not a reason to rule metal out on a more complex roof, but it is a factor the installer plans around specifically.
Dormers, Skylights, Chimneys, and Penetrations
Each penetration through the roof surface requires custom flashing. Each dormer adds valley and transition work. During any contractor conversation, ask how they will approach each of these points on your specific roof. A contractor with real metal roofing experience can walk through their approach in concrete terms. A vague answer is a meaningful signal.
Deck Condition and Any Required Repairs
Deck condition is not always fully known until the old material is off. If sections need replacement, that adds material and labor. A well-run project accounts for this possibility transparently — the homeowner should be informed of what the deck inspection found and what repairs were made before underlayment went down. Soft spots, visible moisture staining, or delaminated sheathing are the kinds of problems an installer is looking for before the new roof assembly begins.
How This Affects Labor Effort
The variables above — roof geometry, penetrations, deck condition, and the precision demands of the specific system — are the primary factors that drive labor complexity on a metal roofing project. When homeowners ask about metal roofing labor cost per square, the answer usually comes back to these same variables. For a full explanation of what drives the total cost of a metal roofing project and how to think about the investment, see our metal roofing cost guide.
What to Expect During the Installation
Typical Project Timeline
A residential metal roofing installation on a straightforward roof typically takes one to three days from tear-off through final trim. Roofs with more complex geometry, penetrations requiring additional flashing work, or deck repairs that emerge during the project take longer. A contractor who gives a confident timeline before seeing the deck in full should be willing to revisit that estimate if conditions change.
Noise, Disruption, and Access
Metal roofing installation is not a quiet process. Tear-off, deck work, and panel installation all generate significant noise. Plan accordingly if anyone in the household needs a quieter environment during the work day. The crew will need clear access around the perimeter of the house, and items close to exterior walls should be moved before work begins.
How to Know the Job Was Done Right Before the Crew Leaves
Before the crew departs, a walkthrough is worthwhile. Look for clean panel seams with no exposed fasteners, consistent ridge cap and trim across the full perimeter, and confirmation that all penetrations and valleys have been properly flashed. Any gap, inconsistent trim fitting, or unfinished transition should be addressed before the project is marked complete.
Is Metal Roofing Installation Right for Your Michigan Home?
Michigan Climate and What It Means for Installation Timing
Michigan’s winters — significant snow load, repeated freeze-thaw cycling, and temperature swings from cold to warm across the shoulder seasons — place specific demands on a roofing installation that moderate climates do not. Experienced installers in Michigan plan their project calendar to take advantage of weather windows where conditions allow proper panel handling and sealant performance, though installation in colder temperatures is achievable with the right materials and procedures.
Why Freeze-Thaw Performance Starts at Installation, Not After
A standing seam roof’s resistance to ice dam formation in Michigan winters is not automatic — it is a function of how the roof is installed. The eave flashing, the underlayment specification, and the way the panel system manages water movement toward the drainage edge all affect whether the finished installation performs the way it should in repeated freeze-thaw conditions.
A properly installed metal roof handles this climate without the granule loss, edge deterioration, or moisture absorption that shortens asphalt shingle life in Michigan. That performance advantage belongs as much to the installation as it does to the material. If you are still evaluating whether metal roofing is the right choice for your home, our metal roofing pros and cons guide covers both sides.
Frequently Asked Questions About Metal Roof Installation
How long does it take to install a metal roof?
Most residential metal roofing projects take one to three days on a straightforward roof. More complex geometry, additional penetrations, or deck repairs can extend the timeline. A proper contractor assessment before the project begins should include a realistic timeline estimate for your specific roof.
Can metal roofing be installed over an existing roof?
In some cases, yes — but full tear-off is the stronger approach because it gives the installer access to the deck for inspection and repair. Overlay installations skip that step. Deck problems that go unaddressed under new metal become harder and more expensive to fix later.
What is the labor cost to install a standing seam metal roof?
The labor cost to install a standing seam metal roof depends on the size and geometry of the roof, the number and complexity of penetrations and transitions, deck condition, and the specific panel system being used. Standing seam is more labor-intensive than through-fastened systems because of the clip-based attachment, panel forming requirements, and precision at every flashing point. For a complete breakdown of the cost variables involved, see our metal roofing cost guide.
How much does metal roofing cost per sq ft?
The answer depends on material selection, roof complexity, and the installer’s experience level. Standing seam carries a higher installed cost than exposed-fastener systems because of the materials and labor the system requires. Our full cost breakdown covers the full range of variables and how to think about the investment.
How do I know if my contractor has real metal roofing experience?
Ask directly: what percentage of their work is metal roofing? Then ask them to explain specifically how they will handle each valley, penetration, and flashing transition on your roof. A contractor with genuine standing seam experience answers those questions in concrete terms. Vague reassurance or references to general roofing experience are not equivalent to metal-specific work history.
If you have worked through the process and want to talk through what it would look like for your specific roof, contact Heritage Metal Roofing for a free estimate.